IBM 16/4 Token-Ring CardBus Adapter
Notes:
- This adapter works only with laptop computers that support CardBus.
- If you are using Card and Socket Services, you might be able to use
hot-pluggability features. See Hot-pluggability and suspend/resume issues.
To insert the adapter into your computer, perform the following
steps:
- Switch OFF (O) the power to the computer.
- Determine what type of network cable to use and connect the cable to the
network:
| Note: | Shielded cables and connectors must be used in a Class B environment.
|
- If your network uses STP or UTP cabling with an RJ-45 telecommunications
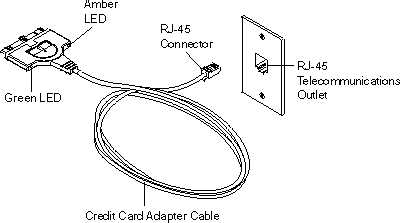
outlet, as shown in Figure 1, attach the RJ-45 (8-pin modular) connector on the adapter
cable (PN 31L5035) to the RJ-45 telecommunications outlet.
Figure 1. Connecting the adapter cable to RJ-45 outlet
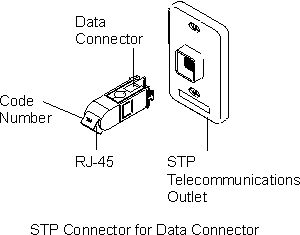
- If your network uses STP cabling with an STP telecommunications outlet, as
shown in Figure 2, perform the following procedure:
Figure 2. Connector for STP outlet
- Attach the RJ-45 connector on the adapter cable (PN 31L5035) to the RJ-45
end of the STP connector (PN 73G8314).
- Attach the STP connector to the STP telecommunications outlet.
The STP connector is specifically designed to work with the CardBus
adapter.
| Note: | Verify that you are using the correct STP connector. The correct STP
connector and adapter cable have the code number 100 on the connectors that
attach to each other.
|
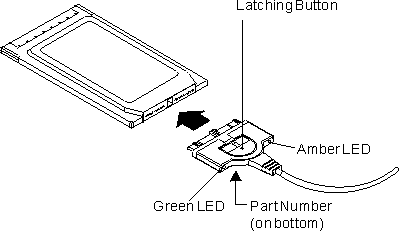
- To attach the cable to the adapter, move the latching button (the
half-circle in the center of the cable connector) toward the cable. You
must retract the latch to connect or disconnect the cable.
Attach the cable to the adapter with the cable part number on the bottom,
as shown in Figure 3. The connector is keyed to attach to the CardBus
adapter only one way. If you feel any resistance, remove the connector,
turn it over, and reattach it.
Figure 3. Attaching the cable to the adapter
- To lock the cable securely, move the latching button
in toward the adapter.
| Note: | There are cases in which you might want to leave the cable latch
retracted. For example, if the latch is retracted when you pull the
cable, the cable will disconnect from the adapter. This could prevent
someone from accidentally pulling your computer off of a table.
|
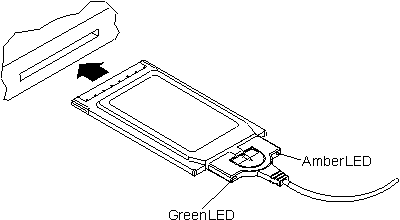
- Insert the CardBus adapter in the slot, as shown in Figure 4. If you are using a point enabler, note which slot
you use.
Figure 4. Inserting the adapter into the CardBus slot
The CardBus adapter is keyed to attach to the PC only one way. If
you feel resistance as you are inserting the adapter, remove the adapter, turn
it over, and reinsert it.
- Switch ON (|) the power to the computer.
To remove the CardBus adapter from your computer, perform the following
steps:
- Switch OFF (O) the power to the computer.
- With the cable still attached to the adapter, pull the adapter from the
computer.
- To detach the cable from the adapter, retract the latching button (the
half-circle in the center of the connector) by moving it toward the
cable.
- Grasp the connector and unplug it from the adapter.
- Store the adapter.
| Note: | When the cable is removed from the CardBus adapter, the adapter appears to
the system as if it is physically removed from the socket.
|
Some drivers support a level of hot-pluggability and
suspend/resume. These drivers are for Card Wizard 4.1 and
5.0 on Windows NT(R) Workstation 4.0, Windows(R) 95
OSR2, Windows 98, Windows Me, and Windows 2000 Professional.
Attention: To use the hot-plugging features of this card, you
must use Card and Socket Services. If you are using a point enabler,
do not unplug your card while the power is on. You might
damage both your card and the machine.
Hot-pluggability refers to the ability to remove and insert your CardBus
adapter at any time while the machine is running. Hot-plugging allows
you to remove your card while you are using battery power, thus reducing the
drain on your battery. It also provides greater freedom to use portable
computers in a portable manner. When you remove the cable from the
CardBus adapter, the adapter appears removed physically from the
system. When you reattach the cable, the adapter appears inserted into
the system. You can hot-plug the CardBus adapter without physically
removing it from the socket by removing and attaching the cable.
Windows 95, Windows 98, Windows Me, and Windows 2000 Professional have
built-in support for hot plugging and suspend/resume. They
recognize the CardBus adapter when it is inserted into a CardBus socket (or
the cable is attached to an inserted CardBus adapter) and load the correct
driver and configured protocol stack for the CardBus adapter.
If you plan to disconnect from your network, perform the following
procedure:
- Click the CardBus adapter icon on the status bar.
A message box appears with a message to stop the CardBus adapter.
- Click the message box.
- When the Safe to remove message appears, you can either remove the cable
or physically remove your CardBus adapter.
[ Top of Page | Previous Page | Next Page | Table of Contents | Index ]


