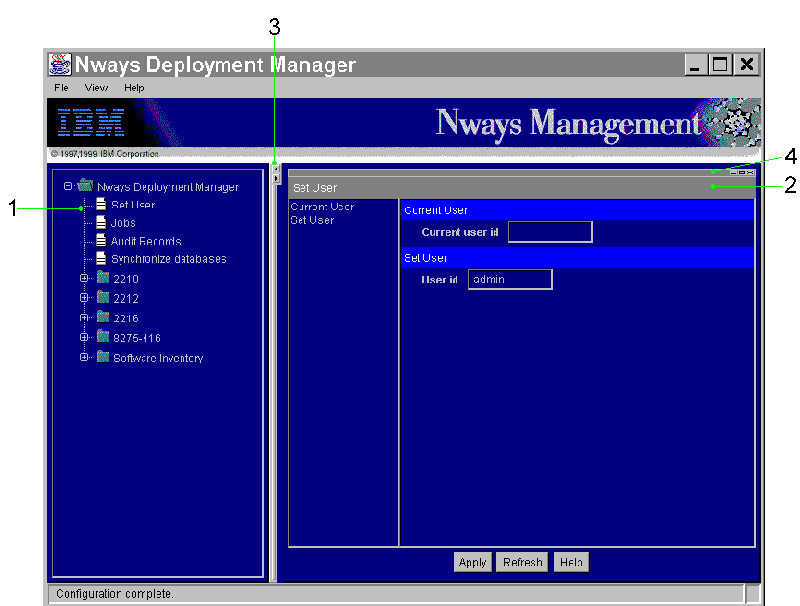

Figure 1 shows the Deployment Manager main menu.
 |
Deployment Manager menus are divided into these areas:
| (1) |
Navigation Tree The navigation tree provides a hierarchical listing of the functions available with Deployment Manager. Folders represent categories of functions. For example, the highest level folder is the application itself (Nways Deployment Manager). Lower level folders include the 2210, 2212, 2216, and 8275-416 folders, each of which contains the functions available for managing device configurations. In addition the Software Inventory folder includes the functions available for managing base code components, such as load images or PROM images. You can open the contents of a folder by clicking on the plus (+) next to the folder. A list of pages is displayed. To close a folder, click on the minus (-) next to it, which collapses the list of pages for this folder. However, the folder itself remains visible. Pages are displayed within folders; they represent the specific functions that can be performed. To perform a task, click on the page icon or the text to the right of the icon. The task panel is updated with information related to that task. For example, to add a 2210 device record to the NwDM database, click on
Create Device in the 2210 folder. The Create Device task panel is
displayed in the task panel area.
|
| (2) |
Task Panel The task panel shows specific panels related to the functions available within NwDM. The left side of the task panel displays specific tasks that can be performed, and the right side of the displays task panes associated with each of the specific tasks. For example, when you click Set User, the left side of the Set User task
panel displays Current User and Set User. The right side displays task
panes associated with the Current User and Set User.
|
| (3) |
Draggable Axis The Draggable Axis allows you to change the width of the navigation tree and the task panel in relation to the size of the Nways Deployment Manager interface. To have the Navigation Tree fill the entire interface, click the right arrow at the top of the Draggable Axis. Clicking the left arrow returns the interface to the default layout. For example, to have the task panel fill the entire screen, click the left
arrow at the top of the Draggable Axis. Clicking the right arrow
returns the interface to the default layout.
|
| (4) |
Tear-Off Bar You can use the Tear-Off Bar to drag the task panel to another location on your desktop. To move the task panel, click and hold the Tear-Off Bar while dragging the panel to another location with your mouse. If you tear-off the Task Panel, it continues to work. Clicking an
item on the navigation tree will create a new task panel in the Nways
Deployment Manager interface.
|
Nways Deployment Manager serves as a database for information about the devices in your network. Therefore, Nways Deployment Manager can potentially have information about thousands of devices. Filters provide a way for you to search for specific information rather than having to scroll through the entire contents of the database to find what you are looking for.
Most task panels contain a filter pane that you can use to search the database. You fill in the fields for a filter and then click Apply Filter. The results are returned in the form of a Filtered List. From this list, you can select records to be added to the Custom List, which allows you to store the results from several different database queries, add them all to a single list, and perform operations against that list.
Filters are tables that contain three columns:
Nways Deployment Manager uses standard SQL comparison operators. The In comparison operator is the default operator. To select a different comparison operator, click on a cell in the Comparison Operator column. Then click on the box to the right of the operator and select the operator that you want to use.
The comparison operators are:
| Note: | You cannot use the Like comparison operator with numbers. |
For example, if you are searching for a property value of "abc def" using Like, and in the Expression column you specify:
For example, if you are searching for a property value of "42" using between, and in the Expression column you specify:
You can also specify Between to compare strings. When comparing strings, you must enclose both strings in single quotes. For example, if you are searching for a property value of "pqr" using Between, and in the Expression column you specify:
To enter data in the Expression column:
You can cut data from cells, copy data between cells, and paste data into cells. If you are using Windows NT:
You can also use expressions in this column, or you can specify multiple values by separating each value with a comma (,).