The analyzer provides several alternative tools for setting the sweep range and customizing the diagrams. Choose the method that is most convenient for you.
The sweep range for all channels is displayed in the channel list across the bottom of the diagram area:

To change the sweep range, use one of the following methods:
Press the START CENTER or STOP SPAN keys in the CHANNEL keypad.
Right-click the start or stop value in the channel list and select Start, Stop, Center, Span from the context menu.
Select Start, Stop, Center, Span from the Channel – Stimulus menu.
Use the marker functions (MARKER FUNCT key).
The analyzer provides three parameters for changing the scale of the vertical (response) axis:
Changing the Reference Value or Reference Position shifts the trace in vertical direction and adjusts the labels of the vertical axis. Reference Value also works for radial diagrams.
Changing the Scale/Div. modifies the value of the vertical or radial diagram divisions and thus the entire range of response values displayed.
The Scale/Div. and the Reference Value are indicated in the scale section of the trace list.

To change one of the parameters use one of the following methods:
Press the SCALE key in the TRACE keypad.
Right-click the scale section in the trace list and select the parameters from the context menu.
Select the parameters from the Trace – Scale menu.
Use the marker functions (MARKER FUNCT key).
The Autoscale function adjusts the scale divisions and the reference value so that the entire trace fits into the diagram area. To access Autoscale, use one of the following methods:
Press the SCALE key in the TRACE keypad.
Right-click the scale section in the trace list and select Autoscale from the context menu.
Select Autoscale from the Trace – Scale menu.
The radial scale of a circular (Polar, Smith or Inverted Smith) diagram can be changed with a single linear parameter, the Reference Value. The reference value defines the radius of the outer circumference.
Increasing the Reference Value scales down the polar diagram.
Decreasing the Reference Value magnifies the polar diagram.
The Reference Value is indicated in the scale section of the trace list.

To change the Reference Value use one of the following methods:
Press the SCALE key in the TRACE keypad.
Right-click the scale section in the trace list and select the parameter from the context menu.
Select the parameter from the Trace – Scale menu.
Use the marker functions.
 The Autoscale
function also works for polar diagrams.
The Autoscale
function also works for polar diagrams.
Marker functions are a convenient tool for scaling (in particular: magnifying) diagrams without entering explicit numeric values. You simply place a marker to a trace point and use the marker values to change the sweep range or move the trace relative to the vertical axis. A mouse makes it easier to activate (click) or move (drag and drop) markers.
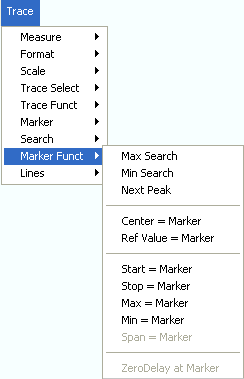
To set the sweep range use one of the following methods:
Create two normal markers, e.g. the markers M 1 and M 2, and place them to the desired start and stop values of the sweep range.
Activate M 1 and click Trace –Marker Funct. – Start = Marker.
Activate M 2 and click Trace –Marker Funct. – Stop = Marker.
Create a marker and set it to delta mode.
The analyzer automatically creates a reference marker in addition to the delta marker.
Place the reference marker to the desired start value of the sweep range.
Set the value of the delta marker equal to the desired (positive or negative) span.
Activate the delta marker and click Trace –Marker Funct. – Span = Marker.
To move the trace relative to the vertical axis proceed as follows:
Create a normal marker, e.g. the marker M 1, and place it to a particular trace point. E.g. you can use the marker Search functions to locate a maximum or minimum on the trace.
Click Trace – Marker Funct. – Max = Marker to move the trace towards the upper diagram edge, leaving the values of the vertical divisions (Scale Div.) and the overall vertical scale unchanged. Analogously, click Min = Marker to move the trace towards the lower diagram edge, or click Ref Value = Marker to move the trace towards the Reference Value.
The analyzer provides different tools for customizing the contents and size of the diagram areas:
Maximize allows you to enlarge the active diagram area to occupy the whole window. A double-click on any point in the diagram area is equivalent to the Maximize function.
The Title, the Softkey Labels, the Status Bar and the Hardkey Bar are optional display elements which you can hide in order to gain space for the diagram.
Use the context menu of the diagram area, the keys in the DISPLAY keypad or the Display menu to access the scaling functions above.

