A LAN connection is used to integrate the analyzer into a home/company network. This offers several applications, e.g.:
Transfer data between a controller and the analyzer, e.g. in order run a remote control program.
Control the measurement from a remote computer using the Remote Desktop application.
Use external network devices (e.g. printers).
|
|
Attention! An efficient virus protection is a prerequisite for secure operation in the network. Never connect your analyzer to an unprotected network because this may cause damage to the instrument software. |
To establish the connection proceed as follows:
Press the Windows button and open Windows XP's control panel.
Select System and open the Remote tab in the System Properties dialog. Enable Allow users to connect remotely to this computer.
Assign an IP address to the analyzer following the directions below and connect the analyzer to the network as described in Connecting a LAN Cable.
Create a Remote Desktop Connection using the analyzer's IP address.
 The analyzer uses a user name and password as credentials for remote access.
In the factory configuration, instrument is
preset for both the user name and the password. To protect the analyzer
from unauthorized access, it is recommended to change the factory setting.
The analyzer uses a user name and password as credentials for remote access.
In the factory configuration, instrument is
preset for both the user name and the password. To protect the analyzer
from unauthorized access, it is recommended to change the factory setting.
Depending on the network capacities, the TCP/IP address information for the analyzer can be obtained in different ways.
If the network supports dynamic TCP/IP configuration using the Dynamic Host Configuration Protocol (DHCP), all address information can be assigned automatically.
If the network does not support DHCP, or if the analyzer is set to use alternate TCP/IP configuration, the addresses must be set manually.
By default, the analyzer is configured to use dynamic TCP/IP configuration and obtain all address information automatically. This means that it is safe to establish a physical connection to the LAN without any previous analyzer configuration.
|
|
Attention! If your network does not support DHCP, or if you choose to disable dynamic TCP/IP configuration, you must assign valid address information before connecting the analyzer to the LAN. Contact your network administrator to obtain a valid IP address, because connection errors can affect the entire network. |
To disable dynamic TCP/IP configuration and enter the TCP/IP address information manually proceed as follows:
Obtain the IP address and subnet mask for the analyzer and the IP address for the local default gateway from your network administrator. If needed, also obtain the name of your DNS domain and the IP addresses of the DNS and WINS servers on your network. If you use both LAN connectors, you need two different sets of address information.
Press the Windows key to access Windows XP.
Open the Control Panel –Network Connections – Local Area Connection Status – Local Area Connection Properties – Internet Protocol (TCP/IP) Properties dialog and enter the address information, e.g.:
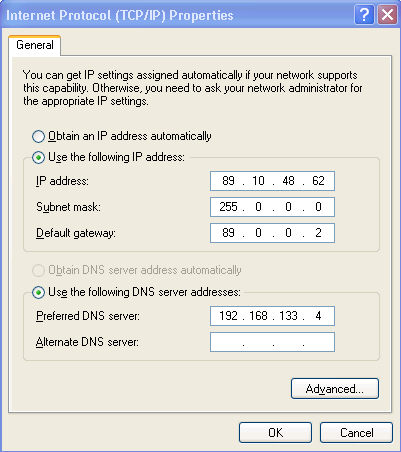
For more information refer to the Windows XP Help.
Remote Desktop is a Windows application which can be used to access and control the analyzer from a remote computer through a LAN connection. While the measurement is running, the analyzer screen contents are displayed on the remote computer, and Remote Desktop provides access to all of the applications, files, and network resources of the analyzer.
To set up a Remote Desktop connection
Connect the analyzer to a LAN and determine its IP address; see Remote Operation in a LAN.
Set up your remote computer (integrated in the LAN) to use Remote Desktop and create the Remote Desktop connection to the analyzer.
For detailed information about Remote Desktop and the connection refer to the Windows XP Help.


