(artname: fgl1a010.EPS)

You can manage your switch through your Web browser and Internet connection. This is referred to as Web-based management. To access the switch, your Web browser must support:
This chapter explains how to access the switch Web-based management panels to configure and manage your switch.
It is important to note that there are equivalent functions in the Web interface as in the terminal interface (that is, there are usually the same menus to accomplish a task). For example, when you log in, there is a Main Menu with the same functions available, and so on. The Web login session will be automatically logged off based on the Telnet timeout settings. There are several differences between the Web and terminal interface. For example, on the Web interface the entire forwarding database can be displayed, and the terminal interface only displays 10 entries starting at specified addresses.
So, if you have read Configuring your switch and Using the Terminal Interface, navigating the Web interface will not be difficult. This chapter is a brief introduction to the Web interface.
To have Web access to the switch:
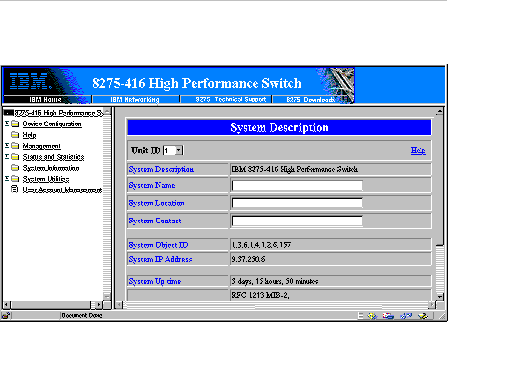
A Web interface panel for the switch Web page consists of three frames (Figure 62). Frame 1, across the top, appears a banner graphic of the switch. Frame 2, at the bottom-left displays a hierarchical-tree view. The tree consists of a combination of folders, subfolders, and configuration and status HTML pages. You can think of the folders and subfolders as branches and the configuration and status HTML pages as leafs. Only the selection of a leaf (not a folder or subfolder) will cause Frame 2 to display a new HTML page. A folder or subfolder has no corresponding Frame 3 HTML page. Frame 3, the bottom-right frame, displays the currently selected device configuration status or the user configurable information that you have selected from the tree view of Frame 2, or both. You can resize each of these frames. There are no fixed-sized frames.
Figure 62. Web interface panel-example
 (artname: fgl1a010.EPS) |
| Note: | You must configure the IP address of the switch before using the Web interface. |
Follow these steps to bring up the switch Web interface:
| Note: | There is an inactivity timeout associated with a Web session. The timeout value is the same one that is used for Telnet sessions. |
The following command buttons are used throughout the Web interface panels for the switch: