The File menu provides standard Windows™ functions to create, save, recall or print setups, to copy the current screen and to shut down the application.
A setup comprises a set of diagram areas with all displayed information that can be stored to a NWA setup file (*.zvx). Each setup is displayed in an independent window.
The Window menu commands arrange different windows on the screen.
The File menu is used to organize setups.
 The relation between global
settings, setups, channels and traces is described in the Basic
Concepts
section.
The relation between global
settings, setups, channels and traces is described in the Basic
Concepts
section.
|
|
|
The File menu contains the following functions:
New creates a new setup and opens a new setup window.
Close closes an opened setup window.
Print prints a setup.
Print Preview displays the setup on the screen as it would appear printed.
Page Setup... selects a printer and printer connection.
Print to Clipboard copies the screen contents to the clipboard in order to be pasted into another application.
Print to File... opens a dialog to select a file and file format to store the screen contents.
Save saves an opened setup to a specific file.
Open/Recall recalls an existing setup from a file.
Window displays the softkeys of the Window menu.
Trace Data opens a submenu to store one or several data or memory traces to a file or loads a memory trace from a file. The submenu is also part of the Trace menu (Trace – Trace Funct – Import/Export Data).
1 Set<n>.zvx etc. is a list of the last 4 setups stored in the current or in previous sessions.
Exit closes the application.
Creates a new setup and opens a new setup window. The new setup is named Setup<n> where <n> is the current number for all created setups.
To open
an existing setup, select File
–
Open / Recall. To rename a setup, use File
– Save
As.
|
Remote control: |
Closes an opened setup window. The analyzer suggests to save changes to the setup before closing it. If a setup is closed without saving, all changes made since the last time it was saved are lost.
|
Remote control: |
Prints the active setup. This command opens a standard Windows™ Print dialog box to, specify the range of pages to be printed, the number of copies, the destination printer, and other printer setup options.
|
Remote control: |
The
commands in the HCOPy... system
provide the printer settings.
|
Provides options to specify how the setup should be printed. Print is opened by means of the File – Print... command.

The following printer options are remembered when the dialog is closed:
Select Printer displays the active printer and printer connection. The printers and printer connections can be selected from the Name drop-down list.
Preferences opens a dialog to select the layout and paper format and specify further printer options.
Find Printer opens a dialog to select and install a printer that is not yet installed on the instrument.
Page Range specifies the pages to be printed. The analyzer prints the entire setup.
Number of Copies specifies the number of copies to be printed for the above page range.
To
select further printer options, open the Print
Setup
dialog.
|
Remote control: |
Displays the active setup as it would appear when printed. The analyzer generates one printed page for each diagram area in the setup. The main window is replaced with a print preview window in which one or two pages/diagram areas are displayed in their printed format.

Across the top of the screen the print preview toolbar offers options to view either one or two pages/diagram areas at a time; move back and forth through the setup; zoom in and out of pages/diagram areas (2 steps possible); initiate a print job or close the preview without printing:

|
Remote control: |
No
commands for check on screen. |
Selects a printer and a printer connection. This command presents a Page Setup dialog box to specify the printer and its connection.
Provides options to specify how the document should be printed. Page Setup is opened by means of the File – Page Setup... command.

Paper – Size specifies the size of paper that the document is to be printed on.
Paper – Source specifies the paper source, because some printers offer multiple trays for different paper sources.
The radio buttons in the Print panel specify whether or not different diagram areas are printed on different pages.
The radio buttons in the Orientation panel specify whether the pages are printed in Portrait or Landscape format.
The Margins panel contains input fields to define a margin on each of the four edges of the pages.
The check boxes in the Add panel select additional information to be included in the printed document.
Printer... opens the Page Setup dialog to select the printer and printer connection. The printers can be selected from the Name drop-down list. Network... opens a dialog to configure the printer connections. Properties opens a dialog to select the layout and paper format and specify further printer options.

Preview shows the active setup as it would appear when printed.
To
select the Print Range and start
printing, open the Print
dialog. To install printers and configure ports use the Control
Panel.
|
Remote control: |
HCOPy:DESTination |
Copies the current screen or a portion of it to the clipboard in order to be pasted into another application.
Use Print
to File
to copy the screen contents to a file with a selectable bitmap format.
Print to File also provides options
to specify which portion of the screen is copied to the clipboard.
Opens a Print to File dialog to select a file and file format to store the current screen contents.
|
Remote control: |
Provides options to specify how the screen contents are stored to a file. Copy Display is opened by means of the File – Copy Screen to File command.
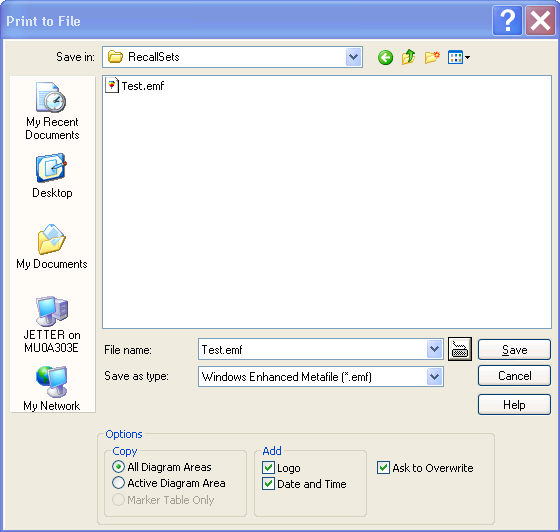
Save in specifies the drive and directory in which the screen contents are stored. The icons to the right of the pull-down list are provided for easy navigation in the file system (place the cursor on the icons to obtain What's this? help).
File Name specifies a file name to save the screen contents. The analyzer adds the extension (e.g. *.emf) selected in the Save As Type box.
Save saves the screen contents in the selected file and directory and closes the dialog. The print options are maintained and can be reused when Print to File is used for the next time.
Cancel closes the dialog without saving the screen contents.
The Options... panel provides options to specify whether the entire screen (All Diag. Areas) or a portion of it (Active Diag. Area, Marker Table Only) is copied, whether or not the logo, date and time is placed above the selected output, and whether the analyzer displays a message to be confirmed before overwriting an existing file. The options are remembered when the dialog is closed.
 After a file has
been saved, the selected copy Options
are also used if the screen is copied to the clipboard.
After a file has
been saved, the selected copy Options
are also used if the screen is copied to the clipboard.
|
Remote control: |
HCOPy:DESTination
'MMEM' |
Saves and names the active setup. The analyzer opens a standard Windows™ Save As dialog box to select a NWA setup file name (*.zvx) and location for the setup file.
|
Remote control: |
Specifies the name and location of a particular file (e.g. a NWA setup file) to save:

File Name specifies a file name to save the current data (e.g. the setup). The analyzer adds the extension (e.g. *.zvx) in the Save As Type box.
Save in specifies the drive and directory in which the data is stored. The icons to the right of the pull-down list are provided for easy navigation in the file system (place the cursor on the icons to obtain What's this? help).
Save saves the data (e.g. the active setup) in the selected file and directory and closes the dialog.
Cancel closes the dialog without saving the data.
The Save As dialog
is used to store various data types (e.g. cal kit data, limit lines, sweep
segment lists, ...). Depending on its use the dialog is opened with different
file locations and data types. File locations (directories) are remembered
when the dialog is closed. To restore default directories use the System – System Configuration – Resets dialog.
Recalls an existing setup from a file. The analyzer opens a standard Windows™ Open File dialog box to select the file from all NWA setup files (*.zvx) stored on the file system.
It is not possible to open the same setup in different windows. If an opened setup is changed and an attempt is made to open the same setup again the analyzer displays a warning:

Yes overwrites the changes in the opened setup, No closes the message box, leaving the opened setup unchanged.
It is possible to create and open several setup files with the same contents
but different names or locations. To open/recall
a setup file (*.zvx) you can also use the Windows Explorer and simply
double-click the file or drag and drop the file into the NWA application.
The imported setup becomes the active setup.
|
Remote control: |
Specifies the name and location of a particular file (e.g. a NWA setup file) to open:
Look in specifies the drive and directory in which the file to open is stored. The icons to the right of the pull-down list are provided for easy navigation in the file system (place the cursor on the icons to obtain What's this? help).
File Name specifies a file name (e.g. a setup file, *.zvx) to open. The file can be selected by clicking on the directory overview above.
Open opens selected file and closes the dialog.
Cancel closes the dialog without opening a setup file.
Is a placeholder which is replaced by a list of the last 4 setups stored in the current or in previous sessions. Clicking an item in the list opens the corresponding setup.
Use the setup list in the Window
menu to switch between different open setups.
|
Remote control: |
MEMory:CAT? (returns a list of the loaded files). |
Ends the analyzer session. The analyzer prompts you to save setups with unsaved changes.
This
command is equivalent to the Close
command on the application Control menu.